This printing scenario may be used in case you would like to print from your iOS device to a remote printer; as long as you have Internet connection (Wi-Fi or mobile network) and the receiving printer is connected to an intermediate computer with Internet connection, you will be able to print. If you would like a print job sent from your iOS device to be printed shortly after you sent it to a receiving computer, the latter should be switched on, should not be in hibernation or in sleep mode and should be connected to the Internet. If your computer switches over to hibernation mode or to sleep mode, and you would like to keep it in ‘awake’ state, you will need to go to Control panel on your Windows machine>power management and adjust it accordingly. Otherwise, if your computer is offline or switched off, a print job will be parked at our servers and wait for your computer to log back in to the system, upon which PrinterShare will download the print job and will print it if it is set for automatic printing (alternatively it will download the print job and wait for a command to print out the received print job).
A printer that you would like to print to remotely does not have to be necessarily physically connected to your computer (via USB or a parallel port) and can also be connected wirelessly, but it should already be configured to work with your computer.
If you already have an account and shared your, printers or if the account belongs to someone else to whose printer you would like to print, please skip to step 10.
1. The first step would be to download PrinterShare console. Installers are available on our web page for free.
2. Once the software is installed on your computer, run it, but make sure that your printer (or printers) is switched on.
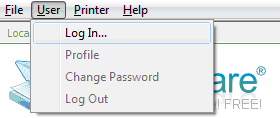
3. Now, you will need to create an account for remote printing. Left-click User>Log in.
4. Left-click Create new account button in the next dialogue window.
5. Input your password and your email address. The user ID (a numerical value) will be generated automatically and sent to an email you have specified in this form along with your password.
6. Now that you're logged in, you'll need to share your printer online. Select the needed printer by left-clicking it in Local printers section of the main PrinterShare console screen.
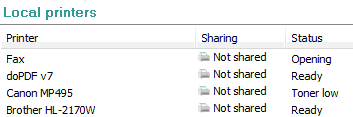
Then -- once it is highlighted -- press button right underneath Local printers section with the list of printers. It will then appear in the list of remote printers with Online status. It will also be shared as a nearby printer.
7. Now, take your iOS device and check that Wi-Fi is active on it by going to Settings>Wi-Fi and that you are connected to a Wi-Fi network.
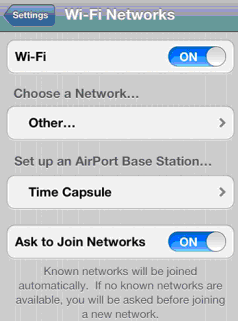
If you would like to print over mobile network, check that data access over mobile network is enabled in Settings > General > Network > Cellular Data Network (if you are an iPhone user).
For more information on setting up APN, please see Apple’s help page on the topic.
8. With that taken care of, take your iOS device and open PrinterShare by tapping on its icon.
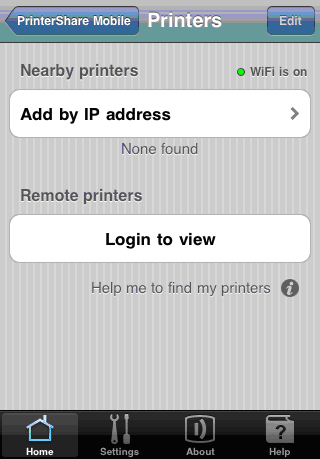
9. You will see the main PrinterShare screen with icons that allow you to access various items that can be printed. Below the grid of icons you will see a button that reads No printer selected; tap it.
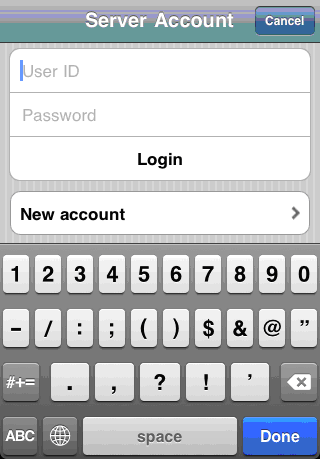
10. Tap on Log in to view button under Remote Printers; input your credentials in the next screen.
Once you log in, you will see printers shared from this account displayed under Remote printers. Tap the needed printer and you can print.
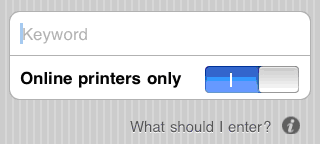
If you would like to print to a printer shared from a different account, you would first need to log in to an account (which you can also create on your iOS device by tapping Login to view/New account), and then tap Find more remote printers button under Remote printers.
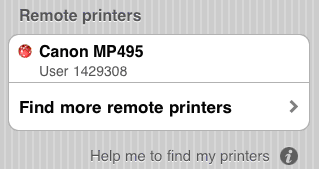
Then, type in ID of the account from which a printer is shared.
*You can also search for shared printers by inputting a nickname, name, email, phone or an address if they were specified by an account owner.
11. Once you select an item you would like to print from the main menu of PrinterShare app, you will be taken to Preview screen where you will be able to adjust printing option (paper type, quality of printing, etc.). Send an item by tapping Print button.
If the item you have sent for printing does not print shortly after you tapped Print, you will need to check whether print job is not waiting for your command to print in PrinterShare console on your computer. You can see a list of pending print jobs in Incoming window which you can access by clicking Incoming button located below Local Printers section of the main screen.
Select the arrived print job by left-clicking it and then click Print button.
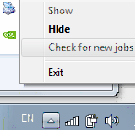
*Please note that PrinterShare console ‘looks’ for new print jobs every 2 minutes; if you would like to speed up the process of discovery, right-click PrinterShare console icon in system tray and left-click Check for new jobs.
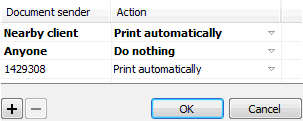
PrinterShare console can handle incoming print jobs depending on the account they are sent from. To add a new custom rule, click Printer>Automation, left-click "+" button, input account ID from which jobs are going to arrive; you can block print jobs from certain accounts (reject automatically), print jobs can be downloaded and wait for your command to print (do nothing) or printed once they are received (print automatically); accounts that are not added manually fall into category of Anyone, and print jobs arriving from these accounts will be handled according to the rule set for Anyone.
You can automate printing by left-clicking Printer>Automation and setting the account from which a print job is originated to Print automatically in desktop PrinterShare console.